








Showing posts with label Photos. Show all posts
Showing posts with label Photos. Show all posts
Saturday, January 19, 2013
It's the Little Things...

Tuesday, March 13, 2012
Do-It-Yourself Ice Cream Soda Party
Girl's Night Part II

As I said in my previous post, my girls and I got together for a relaxing girl's night in to celebrate my roommate's and my birthdays. After enjoying our "gourmet" grilled cheese sandwiches we took a movie break before we hit the dessert. Because I mean, come on, lets be real; what girl's night is complete without desert?? Again, we wanted to keep it easy and simple yet amazing. If theres one thing we can all agree on, it's ice cream. I wanted to do something a little more than just ice cream sundaes and try something new, so I decided on ice cream sodas and floats. After doing some research and looking up some recipes, I found that you can basically make all the recipes with vanilla ice cream as a base. I picked up a few flavors of sodas, some toppings, and some syrups. I set out all of the ingredients and we each got to build our own flavored ice cream soda. So easy and so good. Plus, you'll have a lot of fun putting these together with your guests!
Here's what you'll need:

- Various soda options. We used strawberry, grape, orange, root beer, and a plain seltzer water.
- Toppings of choice. We used Hugs and pretzels (leftover from our pretzel bites), nut toppings, cherries, M&M's, and regular and peppermint whipped cream (not shown). We had a little more toppings in case someone didn't feel like making a soda and just wanted a sundae instead.
- Ice cream. We just used vanilla, but had we had a bigger budget and more guests (there were only 5 of us; we were missing one person), we would have gotten chocolate and strawberry as well. Of course you can experiment with any flavor ice cream you want!
- Flavored Syrups. We used chocolate and caramel syrup. We figured these were pretty standard. You can really get creative and even get flavors such as white chocolate or peppermint.
- Some serving glasses. We had these really cute vintage Coca-Cola glasses and thought that they'd be really fun to use for our party.
How to put these together:
Now, there are 4 components or layers that you need. Each layer can be changed to whatever flavors you want for a mix and match type procedure. In the picture at the beginning of the post, I decided to make a chocolate covered strawberry soda.
- The first layer is ice cream. Fill you glass about half way with ice cream. You can adjust this to as little or as much ice cream as you want depending on what you want your ice cream to soda ratio to be like. You can literally use any flavor you want, just make sure you have some sort of complimentary syrup or soda to mix with it. For mine, I used vanilla.
- The next step is syrup. Now this can be more of a subtle flavor or something that you want most of your flavoring to come from. That being said, the amount of syrup you pour over your ice cream is dependent on how bold you want the flavor of the syrup to show through. You can even skip this layer all together. I used a generous amount of chocolate syrup for mine for the "chocolate covered" part.
- Next comes the soda, again you can use any flavor you want. If you don't want your soda to add flavor so that your flavor combination is from the ice cream and syrup use the seltzer water. I used strawberry soda for the "strawberry" part.
- This is the last and final layer to your creation. Top with some whipped cream and a cherry (or whatever toppings your heart desires) and you're all ready to enjoy this fun dessert. Just add a spoon and a straw! (:

Heres one my friend made. How fun and cute are these?!
Here are some flavor combinations to get you started:
Chocolate Covered Strawberry: vanilla ice cream+ chocolate syrup+ strawberry soda
Purple Cow: vanilla ice cream+ grape soda
Pink Cow: vanilla ice cream+ strawberry soda
Orange Creamsicle: vanilla ice cream+ orange soda
Peanut Butter Cup: Peanutbutter ice cream+ chocolate syrup+ seltzer
Double Chocolate: chocolate ice cream+white chocolate syrup
Chocolate Soda: vanilla ice cream+ chocolate syrup+ seltzer
Almond Joy: chocolate almond ice cream+ coconut syrup+ seltzer
As you can tell, the combination possibilities are endless!! This is such a fun and easy way to make dessert more than just something served to you on a plate. I can't wait to do this for a larger event!

All in all the night was a huge success! Because of our large group size we were forced to split up into two apartments which are, unfortunately, quite aways a way from one another. It was so nice to be able to just spend time all together watching movies and hanging out like the old days when we ALL lived together. Who knew an easy dinner, fun dessert, blankets, and movies make for a spectacular girl's night in. I couldn't have asked for a better night with my lovely ladies!
Friday, February 24, 2012
Pretzel Bites
So my roommate and I were trying to figure out what we should do for our RA for her birthday. Upon some research.. A.K.A Pinterest, we decided to make our own pretzel bites. They looked so cute, and as a college student, they were good for our wallets; and surprisingly, EXTREMELY easy to make!
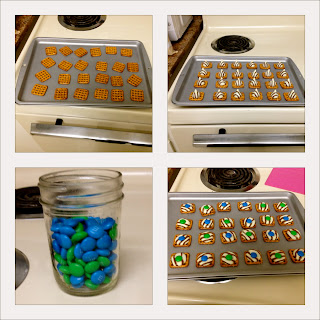
What to Do:
1. Preheat Oven to 200 degrees F.
2. Place pretzels on a cookie sheet. Set one Hershey's Hug on each pretzel. You could use Kisses for this as well. I just really like the way Hugs added a little extra design.
3. Place cookie sheet into the oven for about 4 minutes or until the Hug has melted through. The Hug will keep its shape until you push it down.
4. Don't forget about the M&M's!! You can use any combination of colors that you would like. I chose blue and green because those were my RA's favorite colors. Place an M&M on top of each Hug and push down. This takes a bit of practice, but after the first few, you get the hang of it.

What You'll Need:
Waffle shaped pretzels (I used Von's brand)
M&M's
Hershey's Hugs
Waffle shaped pretzels (I used Von's brand)
M&M's
Hershey's Hugs
What to Do:
1. Preheat Oven to 200 degrees F.
2. Place pretzels on a cookie sheet. Set one Hershey's Hug on each pretzel. You could use Kisses for this as well. I just really like the way Hugs added a little extra design.
3. Place cookie sheet into the oven for about 4 minutes or until the Hug has melted through. The Hug will keep its shape until you push it down.
4. Don't forget about the M&M's!! You can use any combination of colors that you would like. I chose blue and green because those were my RA's favorite colors. Place an M&M on top of each Hug and push down. This takes a bit of practice, but after the first few, you get the hang of it.
So there you have it, super simple and delicious treats! They may not be gourmet cupcakes, but for 10 minutes, it really doesn't get much better. I can't wait to try these again. I'm thinking dark chocolate Kisses and red M&M's for a Minnie Mouse themed party coming up! (:
Subscribe to:
Posts (Atom)


