Blog Archive

Powered by Blogger.

Tuesday, March 13, 2012

Do-It-Yourself Ice Cream Soda Party

Girl's Night Part II

      As I said in my previous post, my girls and I got together for a relaxing girl's night in to celebrate my roommate's and my birthdays. After enjoying our "gourmet" grilled cheese sandwiches we took a movie break before we hit the dessert. Because I mean, come on, lets be real; what girl's night is complete without desert?? Again, we wanted to keep it easy and simple yet amazing. If theres one thing we can all agree on, it's ice cream. I wanted to do something a little more than just ice cream sundaes and try something new, so I decided on ice cream sodas and floats. After doing some research and looking up some recipes, I found that you can basically make all the recipes with vanilla ice cream as a base. I picked up a few flavors of sodas, some toppings, and some syrups. I set out all of the ingredients and we each got to build our own flavored ice cream soda. So easy and so good. Plus, you'll have a lot of fun putting these together with your guests! 

Here's what you'll need:
  • Various soda options. We used strawberry, grape, orange, root beer, and a plain seltzer water. 
  • Toppings of choice. We used Hugs and pretzels (leftover from our pretzel bites), nut toppings, cherries, M&M's, and regular and peppermint whipped cream (not shown).  We had a little more toppings in case someone didn't feel like making a soda and just wanted a sundae instead. 
  • Ice cream. We just used vanilla, but had we had a bigger budget and more guests (there were only 5 of us; we were missing one person), we would have gotten chocolate and strawberry as well. Of course you can experiment with any flavor ice cream you want! 
  • Flavored Syrups. We used chocolate and caramel syrup. We figured these were pretty standard. You can really get creative and even get flavors such as white chocolate or peppermint. 
  • Some serving glasses. We had these really cute vintage Coca-Cola glasses and thought that they'd be really fun to use for our party. 


How to put these together: 
Now, there are 4 components or layers that you need. Each layer can be changed to whatever flavors you want for a mix and match type procedure. In the picture at the beginning of the post, I decided to make a chocolate covered strawberry soda. 
  1. The first layer is ice cream. Fill you glass about half way with ice cream. You can adjust this to as little or as much ice cream as you want depending on what you want your ice cream to soda ratio to be like. You can literally use any flavor you want, just make sure you have some sort of complimentary syrup or soda to mix with it. For mine, I used vanilla. 
  2. The next step is syrup. Now this can be more of a subtle flavor or something that you want most of your flavoring to come from. That being said, the amount of syrup you pour over your ice cream is dependent on how bold you want the flavor of the syrup to show through. You can even skip this layer all together. I used a generous amount of chocolate syrup for mine for the "chocolate covered" part. 
  3. Next comes the soda, again you can use any flavor you want. If you don't want your soda to add flavor so that your flavor combination is from the ice cream and syrup use the seltzer water. I used strawberry soda for the "strawberry" part. 
  4. This is the last and final layer to your creation. Top with some whipped cream and a cherry (or whatever toppings your heart desires) and you're all ready to enjoy this fun dessert. Just add a spoon and a straw! (:


Heres one my friend made. How fun and cute are these?! 

Here are some flavor combinations to get you started:

Chocolate Covered Strawberry: vanilla ice cream+ chocolate syrup+ strawberry soda
Purple Cow: vanilla ice cream+ grape soda
Pink Cow: vanilla ice cream+ strawberry soda
Orange Creamsicle: vanilla ice cream+ orange soda
Peanut Butter Cup: Peanutbutter ice cream+ chocolate syrup+ seltzer 
Double Chocolate: chocolate ice cream+white chocolate syrup
Chocolate Soda: vanilla ice cream+ chocolate syrup+ seltzer
Almond Joy: chocolate almond ice cream+ coconut syrup+ seltzer

As you can tell, the combination possibilities are endless!! This is such a fun and easy way to make dessert more than just something served to you on a plate. I can't wait to do this for a larger event! 

All in all the night was a huge success! Because of our large group size we were forced to split up into two apartments which are, unfortunately, quite aways a way from one another. It was so nice to be able to just spend time all together watching movies and hanging out like the old days when we ALL lived together. Who knew an easy dinner, fun dessert, blankets, and movies make for a spectacular girl's night in.  I couldn't have asked for a better night with my lovely ladies! 

Easy "Gourmet" Grilled Cheese Sandwiches


I have a unique group of girls that I couldn't be any closer with. They are the most amazing friends I could ever ask for and I couldn't imagine college without them. For each one of our birthdays we always do a big surprise dinner and go out. However, after a long couple of weeks (I mean LONNNGG) my roommate and I decided to join our birthdays together and have a relaxing girls night in at our place instead. We wanted to make something super easy and super delicious, and also vegetarian friendly as my roommate does not eat meat! After looking at our options, we decided on the classic yet amazing grilled cheeses. Is there anything better than the combination of delicious bread and savory cheese?? I think not! I volunteered to do the cooking and decided that I wanted to step up a simple grilled cheese a bit. A little experimenting payed off and they were a huge hit; and the best part is, they were so easy to make! With a few simple ingredients you can make some pretty awesome grilled cheese sandwiches that will please everyone!

We headed up to our local Costco and gathered our ingredients. Here's what you'll need:


  •  A couple loaves of bread (depending on how many people you plan on serving). We got fresh uncut Italian loaves. You can use any type you want; there are countless possibilities! We chose this package because, quite honestly, it was the least expensive for the amount of bread we needed. We're college students on a budget so we did our best to keep costs low so that we could splurge on other ingredients. Cutting the bread took a little extra work as opposed to precut bread, but the bread was delicious! I'd definitely buy this again with or without the budget. 


  • A packgage of cheese. Again, the amount you need is dependent on how many people you plan on serving. We got an assorted pre-sliced package which had Swiss, Monterey Jack, Colby, and Cheddar. This seemed like a good mix of cheeses that most people tend to agree on. I'd definitely recommend getting an assorted package so that everyone can have exactly what they like! We did have a bit of extra cheese left over, but that was quite alright because we all love cheese in our apartment. 


  • You're gonna want some shredded Parmegiano Reggiano. Now, I need to warn you, this is probably the most expensive part of the sandwich, but, in my opinion, is worth every penny. It adds amazing flavor to the sandwich that really distinguishes it from a plain ole grilled cheese. The container that we got (shown above) was around $18 but was way more than we actually needed. We probably used no more than about 1/4 of the container at the very most. This was the only size they had, but of course Costco sells in bulk. We probably should've have gotten this at a local grocery store but we were pressed for time.  If this is something that you're not willing to spend money on, some sort of shredded cheese would work fine as well (such as Jack, Cheddar, Colby, Mexican blend...). If you go this route, just be sure to check on your sandwiches frequently as they cook, as times and methods may vary than those listed below. 


  • You're also going to want to get some sort of butter or margarine. Luckily we had this on hand and didn't need to buy it. We used Unsalted butter. 


Now Lets Get Started: 

  1. If you bought unsliced bread you're going want a good knife. The one we used was the only one we had and was kind of dull. This made the bread cutting step much more difficult than it should've been, but definitely do able! If your loaf is a rounded shape or not sized consistently all the way through I'd cut off the ends until the loaf is more or less consistent. This step is somewhat important because one slice of bread will make one sandwich and you don't want to end up with some really tiny ones and some huge, unless you like that, in which case feel free to used the ends! Once this is done, cut the bread into slices. For these hearty sandwiches, you're going to want to make the slices a little bit on the thicker side so that they can withstand all the deliciousness that they will soon encounter!  If you went with pre-sliced bread, you can skip this step! (:
  2. Once you've gotten all of your bread sliced, cut each slice in half as evenly as you can. If you're a little bit off, it's alright. These sandwiches are going to be devoured anyways! You can start softening up your butter (or butter substitute of choice) at this point. I put mine in a microwaveable dish and microwaved it in 10 sec increments until it was spreadable. 
  3. Once the butter is soft and bread is sliced and cut, spread the butter evenly on the bread and set down buttered side up. Preheat a medium skillet to medium-medium low depending on your individual stove. 
  4. Sprinkle a generous amount of the Parmegiano Reggiano on the buttered sides of the bread and press down onto the butter so that it sticks. This will add a crispy crunchy outside to your sandwich and give it that gourmet feel. You can also add some garlic powder before the Parmegiano Reggiano to give it a nice garlic flavor. 
  5. Once your Skillet is heated, set one piece of bread buttered side down. Follow this with a slice of cheese (we used a slice and a half) and the second piece of bread (buttered side up of course). After about a minute or two check the bottom of the sandwich. You don't want the bottom to burn, which it tends to do faster than you expect; this is why we keep the flame on the lower side. However, you do want it to be nice golden brown. With this sandwich, you're more concerned on how the outside cooks as opposed to the inside. Once you've reached the color you want flip and repeat the cooking process on the other side. 
  6. Now to avoid the burnt Parmegiano Reggiano (which quickly turns the sandwich from yum to gross) the cooking time will be significantly less than the cooking time for the cheese on the inside.  So in order to get the inside to it's gooey goodness potential, I set the sandwiches on a cookie sheet in the oven at about 350 and added each sandwich as I cooked them. This also helped keep them warm so that the first sandwich I made was as fresh and warm as the last one. I left them in there until the cheese melted completely. 
  7. Now serve and sit back. Your guests will have no idea that these took you a couple of minutes to put together!! 
We decided to keep ours simple, but you could completely glam these up with endless combinations of toppings, spreads, and cheeses! Avocado and bacon would make an amazing sandwich. You can even set out options and have guests make their own concoctions as you cook them up for easy do-it-youself sandwiches! 

Friday, February 24, 2012

Pretzel Bites

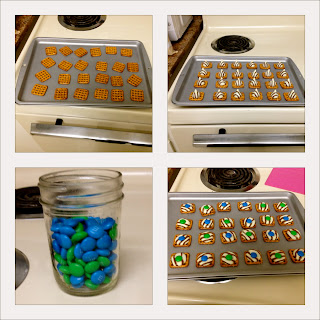
So my roommate and I were trying to figure out what we should do for our RA for her birthday. Upon some research.. A.K.A Pinterest, we decided to make our own pretzel bites. They looked so cute, and as a college student, they were good for our wallets; and surprisingly, EXTREMELY easy to make!
What You'll Need:
Waffle shaped pretzels (I used Von's brand)
M&M's
Hershey's Hugs 

What to Do: 
1. Preheat Oven to 200 degrees F.
2. Place pretzels on a cookie sheet. Set one Hershey's Hug on each pretzel. You could use Kisses for this as well. I just really like the way Hugs added a little extra design.
3. Place cookie sheet into the oven for about 4 minutes or until the Hug has melted through. The Hug will keep its shape until you push it down.
4. Don't forget about the M&M's!! You can use any combination of colors that you would like. I chose blue and green because those were my RA's favorite colors. Place an M&M on top of each Hug and push down. This takes a bit of practice, but after the first few, you get the hang of it. 
So there you have it, super simple and delicious treats! They may not be gourmet cupcakes, but for 10 minutes, it really doesn't get much better. I can't wait to try these again. I'm thinking dark chocolate Kisses and red M&M's for a Minnie Mouse themed party coming up! (:

Wednesday, January 18, 2012

Beautifully Bronze

Today's review consists of my favorite go to MAC bronzers. While these two products are very similar, there are differences. Whether you're a first time MAC shopper or looking to try something new, I hope you find this helpful!! 


MAC Bronzing Powder in Golden Refined:
$23 at any MAC location (MAC store, online, or department store counter)
*More than one swipe was needed for the swatch.

       A few years ago, I made my first MAC purchase. This bronzer was suggested to me by one of ladies working at the MAC counter. This product goes on pretty sheer but is very build-able. The swatch didn't really pick it up, but there are flecks of gold. These flecks are almost, dare I say, chunky. Aside from the gold glitter, the product itself is matte. Now I did use this almost daily for the first year or so but I just couldn't get past the gold glitter after a while. This is bronzer is very good for an all over summer glow. The gold glitter provides a fun addition for those causal, beach wave, summer day. Like I said, it is very build-able. I am an NC20 (for reference) and this product worked well for my skin tone. I believe it would work well with all different kinds of shades of skin depending on use (either to add color or just for the glow it provides). It goes on very smoothly and blends well. While I know $23 is a lot to pay for a bronzer, I've had this product for about 4 years and there is still product. I have hit pan, but it will definitely last me a while longer. For a high quality product that lasts for years, $23 is really not a bad price to pay. I would definitely recommend this for those of you looking for a fun seasonal (or for special occasions) bronzer in addition to your every day staple. 


MAC Bronzing Powder in Matte Bronze:
$23 at any MAC location (MAC store, online, or department store counter)
*More than one swipe was needed for the swatch.
      
      I recently bought this after my search for a matte bronzer. I had tried all of the drugstore bronzers to no avail. I remembered how much I loved my first MAC bronzer and figured that I should give their Matte Bronze a try. This product is indeed matte upon application. In that pan, it looks pretty dark. However, it provides a sheer vail of bronze glow, or with a heavier hand, can be dark on the skin. I find that I have to be aware not to put too much on to avoid that dark streak on my face, as again, I am an NC20. This product is great for that sheer glow or for contouring depending on how you use it. It is very versatile and can be used for a number of uses. Because this bronzer is matte, you can use it every day, for any look you choose whether it be a fun night out, or in a professional setting. It blends very well, which means no harsh streaks. YAY! I've only had this bronzer for about 6 months and have barely made a dent, even though I generally use this on a daily basis. I'm sure that I will get as much use out of this bronzer as I have my Golden Refined, which again, for the price is fantastic. 

Tuesday, January 17, 2012

Luscious Lips

So for my first review, I'm going to be reviewing my 3 most recent lipstick purchases. While I normally am not a lipstick  kind of girl, I decided to jump on the nude lip bandwagon as well as those fun soft pinks. Hope you find some of this helpful for your next lip purchase!! (:

Revlon Colorburst Lip Butter in Cupcake (055):
$6.49 at Target
*The swatch required more than one swipe to show up.

     While I was at Target the other day, I happened to see these and decided to try one on a whim. I have been searching for a nude-ish pink color and thought, "Why not give this a try?". Well let me tell you, I'm glad that I did. This lip color is a bright bubblegum pink in the tube, however when you put it on, it's the same tone, with less intensity; which is nice when you're trying to achieve that soft pink pout. When you put it on it feels very moisturizing like a good lip balm. I personally love this because I hate the drying feeling you get with normal lipsticks. This is the perfect mix between a lip balm and lipstick without the stickiness of a lipgloss. This color is not matte. While it doesn't have any glitter or shimmer, it does have a sheen. This is due to the color itself as well as the creamy consistency. While this is a fantastic product, there is one thing that is both a pro and a con. This color is very build-able. Meaning, the more layers you put on the more you intensify the color. after a couple of layers this does indeed take on the form of that vibrant bubblegum pink that you see in the tube. This is a pro because you can taylor the color to fit your look by means of application. You can use the same product for that soft pink as well as that bold color you're looking for. The only reason I would say that this could possibly be a con is because of the consistency. This is more something I would probably call more of a warning than a con. Now this might just be me, but when it comes to regular lip balms, I find myself constantly applying the nourishing treatment. Because this lipstick feels just like a lip balm, or rather a lip butter, I have to be careful not to apply it so often or else I end up with bright pink lips instead of the nude pink I was going for.. OOPS! Overall I would say this lipstick is definitely worth giving a try. Its a nourishing lip treatment as well as a lipstick all in one, so for us busy ladies, that is some good news! They also come in a variety of colors to fit everyones tastes and preferences. 

NYX Lip Smacking Fun Colors in Harmonica (lss 504):
$3.99 at Ulta


*The swatch required more than one swipe to show up.


      I purchased this at Ulta while on the search for my light pink color. I had heard so many good things about NYX and couldn't wait to try one of their products. And for about $4 how could I resist giving this product a try?! This color is a very pearly light pink. When you first apply this product, it is not drying, but it's also not creamy. The best way I would describe it would be as "thin" and slick. It has a high concentration of shimmer. As I said before, it's a very pearly light pink; I say this because it is VERY light. It is more like a white pink. Personally for the look I was trying to achieve it was way to light. It looked a little ridiculous. While this product has a great bang for your buck, it does wear off rather quickly, and as it wore off it left behind only the white shimmer and looked quite honestly, tacky. This is great to mix with other lipsticks to lighten them up for your custom shade, and for such a great price you can afford to buy many different colors to suit your needs. I wouldn't say these are a miss and I definitely don't regret buying this product. However, if you're wanting long lasting true color I would consider using this as an "enhancer" for other products instead of using it on it's own. 

M.A.C Satin in Myth (AC0):
$14.50 at any MAC vendor (online, MAC counters, or MAC stores)
*Just one swipe for this swatch! 

     Now one thing you must know about me is my determination. Once I get something in my head, there is no stopping me. I was on the hunt for the PERFECT nude lipstick. After weeks of research, from youtube reviews, to blogs and even customer reviews, I finally came to the one lipstick that kept popping up time after time: Myth by MAC. Now as I said previously, I'm not much of lipstick wearer, so I had to do a lot of justifying for spending that much on a lipstick. When I first put this lipstick on it was a little, well, not nude. I later found that this was because I put way too thick of a layer on. This color is a lovely peach nude lip color. It is in a satin finish, so it is matte once applied. I like this because, I naturally have very rosy lips so sometimes I want a truly nude lip without the shine and shimmer. This nude color however is on the orangey side. I find that I have to apply it lightly and blend so I don't look like my put someone else's skin color on my lips. Because of the matte finish, I find that this lipstick is very drying. While the color payoff is phenomenal and lasts for hours; as the hours go by, the lipstick starts to cake on your lips and looks like you have a bad case of chapped lips (even though my lips were very soft and moisturized beforehand). It helps if you put a very good moisturizing lip balm on your lips and let it absorb before applying this lipstick. Next time I might try a different nude shade and finish. I would definitely recommend trying this lipstick if you're looking for a nude shade or are buying your first MAC lipstick. 

Monday, January 16, 2012

Beauty Bag Overload

If theres one thing I've learned from years of buying countless beauty products, is that it's all trail and error. Sometimes those $1 products work better than that $40 product you couldn't wait to get your hands on. It's my goal to embark on a journey of experimentation. I want to try new products and write raw and honest reviews about what works, and what truly doesn't. Stay tuned for reviews and tips! (:

Tuesday, July 19, 2011

Practical Meets Style!

Okay so I've been struggling with finding a practical way to store my hair tools without making my bathroom space look cluttered. I know when dealing with smaller spaces, style is sometimes second to practicality, but who says you can't have both? Of course I don't have money to blow on a fancy appliance holder so I tried to see what I could come up with using what I already had.

So this is made using a vase and some decorative pebbles. The vase was from some roses I got a while back. I thought it was a really cool vase so I was excited to find a good use for it! The decorative pebbles I had from a party I threw. I know Walmart and even the Dollar Store sells vases and they may be in similar styles. The pebbles can also be found at basically any store.

This may not be the fanciest display but I thought it was a really different way than what you normally see. I personally think it adds to the modern decor but of course the best part is that you can customize this to fit your taste and style!!

Remember to make sure your tools are off, unplugged, and cooled before storing them in your display!


Let me know what you think!! (:

Apartment living

So i have recently transitioned to apartment living.. meaning, small space, and no room for my collection of beauty products, particularly when talking about shower space. Yes, i know, i need to downsize but while I did get rid of excess products there was still hardly any room for the necessities. Problem is, when I went to go buy a temporary shower caddy, and they were up to $20!! I tried Walmart and Target for something that could hold all (or most) of my products without emptying my wallet! The solution?? Target dollar section!! Yes, thats right, the dollar section. With $3.00 and a bit of creativity I was able to create an affordable, AND style friendly, shower caddy to hold all of my shower products!! 

Before:
As you can see there was little ledge space. My shampoo and conditioner were half on and half off. It was almost impossible to grab any one bottle without knocking them all over! 
After:
I put this together by getting an over the door hanger with hooks. The dollar section had these plastic totes. Since my roommate and I chose black and shades of teal as our bathroom colors in our apartment in the fall, I chose the blue, but there were a few other colors to chose from to fit your chosen decor! The wide holes made a perfect holder for my razor so that the blades could air dry rather than sit at the bottom where it could harbor major bacteria(gross)! The over the door hooks came in a few other colors as well and I'm sure you could spray paint it in any color of your choosing. The loofah was something I already had on hand. 
(1) over the door hanger- $1
(2) plastic totes- $2
________________
Grand Total: $3!!!! 
All of the these items I found in the Target dollar section. 
Now thats what I call bargain decorating! 
(of course you could probably find comparable items in many stores. If they are not available at your Target. Prices, however, will vary!)
(View from the inside)

(view from the outside)
The over the door component of the hooks weren't quite as wide as they needed to be but I was able to easily widen them using some pliers. I was also thinking of adding two black or aqua bows on the outside where the prongs are.